

Blog
Heat Press Adhesive Backing Patches

Heat Press Adhesive Backing Patches
Iron-on heat seal patches are highly sought-after due to their versatility. They offer a convenient option for those who may not be adept at sewing or prefer a hassle-free approach. At Famous Embroidery, we specialize in creating custom patches that can be easily applied to uniforms or hats. When it comes to heat seal patches, we recommend using a heat press machine for optimal results. However, if you don’t have access to one, you can still apply them using a household iron by applying sufficient heat, pressure, and time. Our goal is to provide you with the perfect patching solution tailored to your needs.
Create Your Own Custom Iron-On Patches
At Famous Embroidery, we specialize in creating custom iron-on patches that cater to your unique needs. With a wide range of patch types available, including embroidered, woven, dye sublimation, and felt, you have the freedom to choose the perfect style for your design. With over two decades of experience in the industry, we have established ourselves as a trusted name in custom patches.
Ordering your custom patches is a simple process. Just fill out our Free Quote Form online and provide us with your artwork. If you’re uncertain about whether iron-on patches are the right choice for your design, we are here to offer our expert recommendations. We can guide you on selecting the most suitable patch type, be it embroidered or woven, based on your specific design requirements.
To ensure your satisfaction, we offer free shipping within the U.S., premium quality iron-on heat seal patches, and a complimentary sample with each order. Unlike other patch companies that only provide a graphic rendering, we go the extra mile by creating an actual sample patch for you to review and approve. This guarantees that the patches you receive match your envisioned design precisely.
At Famous Embroidery, we take pride in delivering exceptional quality and personalized service to our customers. Trust us to bring your patch ideas to life with our professional craftsmanship and attention to detail.
When to Use Heat Press Patches
If you’re interested in learning about heat seal patch backings, they are designed with a special glue that becomes activated when exposed to heat. This adhesive allows the patch to adhere securely to your garment. Heat seal patches are most suitable for fabrics that can withstand high temperatures, like cotton and polyester. Once applied, these patches are durable and can withstand washing, drying, and even dry cleaning. However, it’s important to note that washing them at excessively high temperatures may activate the adhesive, which could potentially cause the patches to loosen from the garment.
How to Apply Heat Press Patches
While we strongly recommend using a heat press machine to apply your heat seal patches, we understand that a handheld iron may be used in certain situations. However, it’s crucial to exercise caution and test the garment beforehand to avoid any potential damage. Different fabrics have different heat tolerances, and subjecting them to excessive heat for prolonged periods can lead to distorted patches or even burned fabric. It’s always advisable to follow the manufacturer’s instructions and take necessary precautions to ensure a successful and safe application process.
To use a heat press machine follow these steps: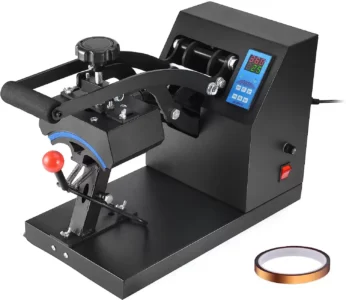
- Set your heat press machine to 360 – 370 degrees Fahrenheit
- Place your patch on your garment in the desired location
- Cover your patch with wax paper to protect it from the heat
- With 40 PSI foam under your garment, apply pressure for about 18 seconds
- Allow to cool and enjoy your new heat seal patches
To apply your heat press patches using an iron, please follow these steps:
- Set your iron: Set your iron to the appropriate temperature for the fabric you are working with. Refer to the garment’s care label or the patch manufacturer’s instructions for the recommended temperature.
- Preheat the fabric: Place the garment on a flat, heat-resistant surface and preheat the area where you will be attaching the patch by ironing it for a few seconds.
- Position the patch: Place the heat seal patch on the desired location of the fabric with the adhesive side down. Make sure it is centered and aligned as desired.
- Apply heat and pressure: Place a pressing cloth or parchment paper over the patch to protect the fabric from direct contact with the iron. Press the iron firmly over the patch and hold it in place for the recommended time, typically around 15-20 seconds. Apply even pressure throughout the process.
- Check the adhesion: After applying heat, carefully lift the corner of the patch to check if it is securely adhered to the fabric. If needed, reapply the heat and pressure for a few more seconds.
- Allow it to cool: Once the patch is securely attached, allow it to cool down completely before handling or moving the garment.